

Windows 7 – Delete Hibernation File (hiberfil.sys)
|
Tutorial Information
|
| Name: |
Windows 7 – Delete Hibernation File (hiberfil.sys) |
| Submitter: |
www.yourforum.gr |
| Category: |
Windows Tutorials |
|
| Submitted: |
4 Aug 2011 |
| Updated: |
4 Aug 2011 |
| Views: |
421 |
| Rating: |
This tutorial is unrated. |
|
|
|
|
Description:
I’ve previously written a post explaining what the hiberfil.sys file is and how you can remove it in Windows Vista. In Windows 7, you the hibernation file can still take up a large amount of space on your hard drive.
In this post, we will show you how to delete the hiberfil.sys file and how to turn off hibernation. You can free up a decent amount of space by doing this.
|
|
Tutorial Instructions
|
Delete Hiberfil.sys File
To delete this file, you have to use the command prompt to manually turn off hibernation. If you turn off hibernation via Power Options (which I will show you next), it will not delete the actual file itself.
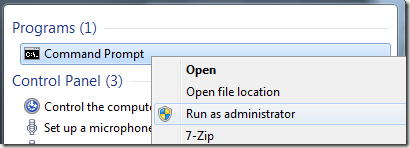
Open a command prompt in Windows 7 by typing command in the search box. Right click Command Prompt and choose Run as Administrator.
To turn off or disable hibernation, type the following command at the prompt:
QUOTE powercfg –h off
This will disable hibernation and will remove the hiberfil.sys file from your system.
Turn Off Hibernation in Windows 7
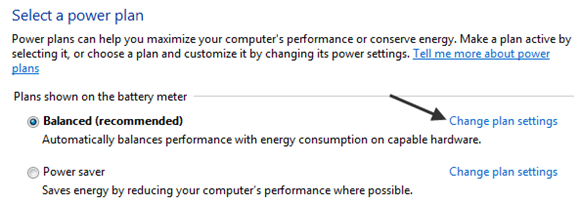
To disable hibernation in Windows 7, you have to go into Power Options and click on Change plan settings.
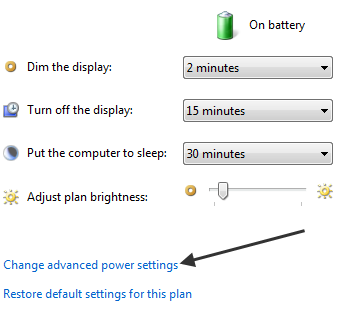
Then click on the Change advanced power settings link at the bottom.
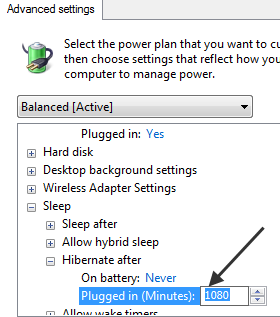
 Now expand Sleep and then expand Hibernate after. Change the value of On battery and Plugged in to 0 minutes. Note that the option will not even be available if you turned off hibernation using the command line. Now expand Sleep and then expand Hibernate after. Change the value of On battery and Plugged in to 0 minutes. Note that the option will not even be available if you turned off hibernation using the command line.
That’s pretty much it! Hopefully, you can reclaim some lost disk space by getting rid of the hiberfil.sys file in Windows 7. Enjoy!
|
|
Comments
|
There have been no comments made as of yet. Why not be the first?
|


