|
|


|
|||||||||
|
|
|
|
||||||
|
|
|||||||||
|
|
 YourForum > Viewing Profile
|
Profile
Personal Photo
Rating
Options
Personal Statement
gpanagou doesn't have a personal statement currently.
Personal Info
gpanagou
Member
Age Unknown
 Gender Not Set
Location Unknown
Birthday Unknown
Interests
No Information
Other Information
Source of interest: from a friend who is already member
Zodiac: No Information
Gender: Not telling
Profile Music: No Information
Statistics
Joined: 5-September 14
Profile Views: 2740*
Last Seen: 13th April 2020 - 09:24 PM
Local Time: 19 Apr 2024, 02:35 PM
40 posts (0 per day)
Contact Information
 No Information No Information
 No Information No Information
 No Information No Information
 No Information No Information
* Profile views updated each hour
|
Topics
Posts
Recipes
Tutorials
Arcade
Gallery
Blog
Files
Comments
Friends
My Content
1 Mar 2016
Background InformationA group of security researchers discovered that SSLv2 (Secure Sockets Layer protocol version 2.0) is vulnerable to the Bleichenbacher RSA padding oracle attack, which can be used to decrypt RSA cipher text without the knowledge of the matching private RSA key. This can be done by observing responses from a server that has the private key and performs the decryption of attacker-provided cipher texts using that key. The researchers also demonstrated a new cross-protocol attack which allows decryption of SSL/TLS sessions using newer protocol versions - SSLv3 or any current TLS (Transport Layer Security) version (1.0 - 1.2) - using this SSLv2 weakness. This flaw is a SSLv2 protocol issue and affects all implementations of the protocol. Researchers refer to this attack as general DROWN. Additionally, flaws were found in the SSLv2 protocol implementation in the OpenSSL cryptography and SSL/TLS library, which make it possible to perform a more efficient variant of the DROWN attack, referred to as special DROWN. These issues were assigned CVE-2016-0703 and CVE-2016-0704 , and were already recently corrected as part of the fix for CVE-2015-0293 . Further details of this attack can be found in the researchers' paper titled DROWN: Breaking TLS using SSLv2 at https://drownattack.com/ , Impact to systemsA server is vulnerable to the DROWN attack if it enables SSLv2 protocol in addition to SSLv3 or TLSv1.x, and if it uses RSA key exchange cipher suites. Server that does not enable SSLv2 can also be vulnerable if it does not enable SSLv2, but shares its private RSA key with another server. For example, DROWN attack can still be used to decrypt HTTPS sessions to a web server that does not enable SSLv2 if it shares its RSA key with e.g. IMAP server, possibly running on the same host, that does enable SSLv2. Use of weak or export SSLv2 ciphers is required to efficiently perform the attack. SSL/TLS connections using non-RSA key exchange, such as Diffie-Hellman or Elliptic Curve Diffie-Hellman, can not be decrypted using the DROWN attack. What configurations are vulnerable to this attack?
2 Sep 2015
QUOTE Call of Duty Modern Warfare 3 smashes entertainment launch recordsCall of Duty: Modern Warfare 3 sells more than 6.5m copies within 24 hours of its launch, earning an estimated $400m in sales
As a Linux system admin we generally face low disk space issues. By implementing the user and group disk quota on the file system we can resolve the space issue. Quota restricts the users to use only allowed disk and inodes on the particular file system. In this post we will discuss how to enable user & group disk quota on /home File system on CentOS 7 & RHEL 7 Step:1 Add usrquota & grpquota option on /home in /etc/fstab file.[root@linuxtechi ~]# vi /etc/fstab  Save & exit the file. In this example I have add user and group quota options on /home Step:2 Remount /home file system via mount command[root@linuxtechi ~]# mount -o remount /home Now recheck the /home file system whether Quota is enable or not. [root@linuxtechi ~]# mount | grep /home Step:3 Create Quota Database Files using quotacheck[root@linuxtechi home]# quotacheck -cugv /home Whereas : -c : create quota file and don’t use the existing file -v : verbose ouput -u : user disk quota -g : group disk quota Above Command will create aquota.user & aquota.group files under /home Turn on quota on /home using below command : [root@linuxtechi ~]# quotaon /home/ Step:4 Assign user & group disk quota via edquota commands# edquota -g [root@linuxtechi ~]# edquota -u jack  [root@linuxtechi ~]# edquota -g sys_admin  As shown above we have two kind of Disk quota limits : soft : It will warn the users if the soft limit of disk quota reached ( size is in KB), in above example for jack user soft limit is 5500 KB ( approx 5.5MB ) hard : It will not allow the users to create new files once the hard limit is reached. ( Size in KB ), in above example hard limit for jack user is 6000 KB ( approx 6 MB ) Note : We can also set the Quota on the basis of the inodes ( i.e numbers of files that the user can create on particular file system). Let’s take an example , login as jack user and try to create a file of 8MB. [root@linuxtechi ~]# su - jack As we see above soft & hard limit is exceeded for jack user. Now onwards user jack can’t create new files. Step:5 Display Quota report for Users in human readable[root@linuxtechi ~]# repquota -as  Step:6 Configure Grace Period for Soft LimitGrace period is the amount of time during which soft limit can can be exceeded, once the grace period reached then soft limit will become the hard limit. Use the edquota command to set Grace period . [root@linuxtechi ~]# edquota -t  Source: http://www.linuxtechi.com/enable-user-group-disk-quota-on-centos-7-rhel-7/
1 Sep 2015
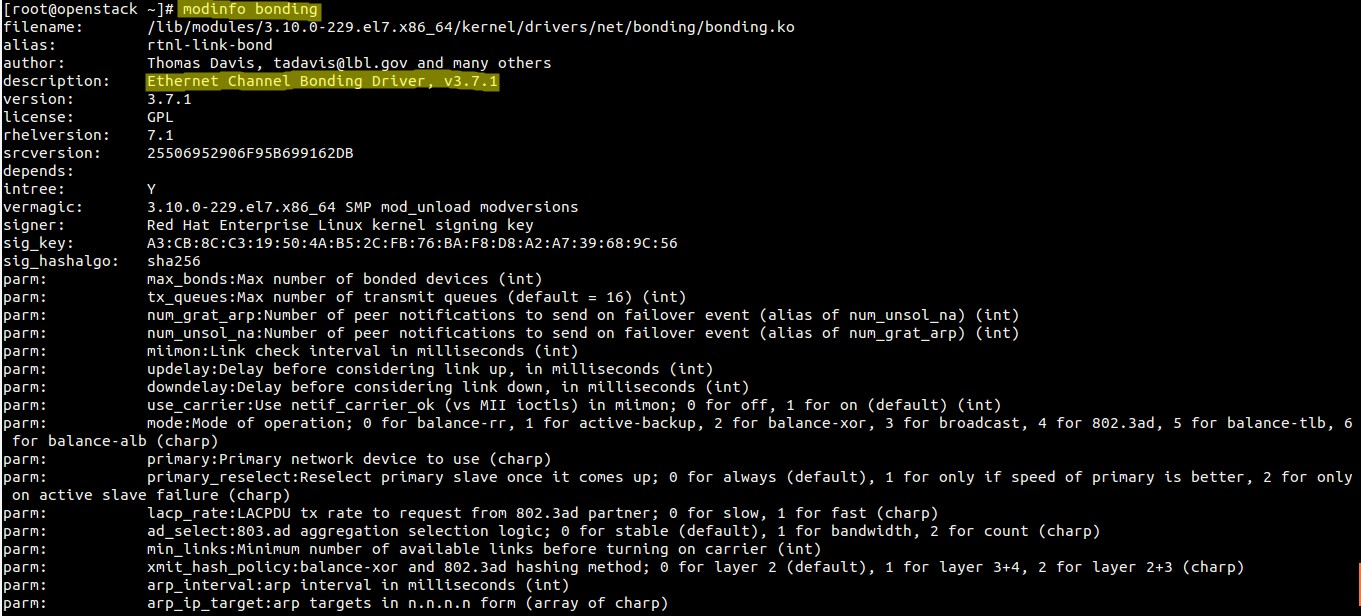
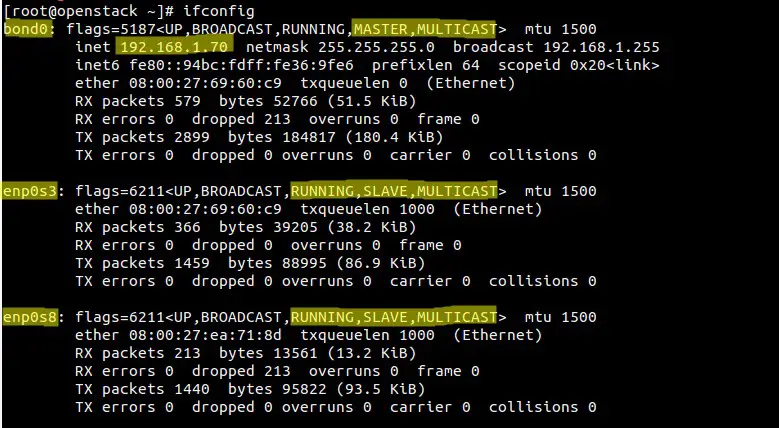
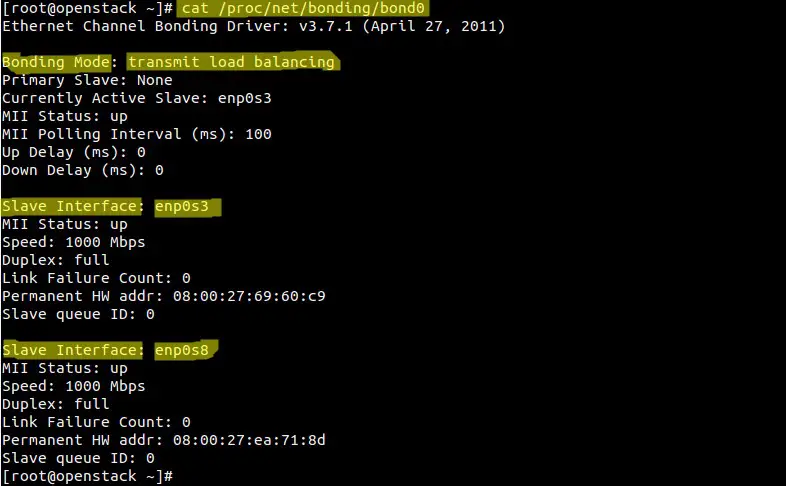
NIC(Network Interface Card) bonding is also known as Network bonding. It can be defined as the aggregation or combination of multiple NIC into a single bond interface. It’s main purpose is to provide high availability and redundancy. In this article we will learn how to configure nic or netwok bonding in CentOS 7 & RHEL 7. In my case I have two interface cards (enp0s3 & enp0s8) and will form a bond interface (bond0). PrerequisiteIf bonding module is not loaded on your linux box then use the below command to load. If bonding module is not loaded on your linux box then use the below command to load. [root@openstack ~]# modprobe bonding To list the bonding module info, use following command. [root@openstack ~]# modinfo bonding Output will be something like below
Create a bond interface file (ifcfg-bond0) under the folder β/etc/sysconfig/network-scripts/β |
1 2 3 4 5 6 7 8 9 10 11 12 13 14 15 | ------------ -[ (Host) ]- ------------ # yum install -y nfs-utils # mkdir /home/{engineha,vms} && chown 36:36 /home/{engineha,vms} # cat > /etc/exports << EOF /home/engineha 192.168.122.0/24(rw,anonuid=36,anongid=36,all_squash) /home/vms 192.168.122.0/24(rw,anonuid=36,anongid=36,all_squash) EOF # # systemctl start rpcbind.service && systemctl enable rpcbind.service # systemctl start nfs-lock.service && systemctl enable nfs-lock.service # systemctl start nfs-server.service && systemctl enable nfs-server.service |
1 2 3 4 5 6 7 8 9 10 11 12 13 | ---------- -[ Host ]- ---------- # showmount -e ovirt01.xrsa.net Export list for ovirt01.xrsa.net: /home/engineha 192.168.122.0/24 /home/vms 192.168.122.0/24 # mount ovirt01.xrsa.net:/home/engineha /mnt && umount /mnt If you get access denied please run the below command and rerun the mount test. # systemctl restart nfs-server.service |
1 2 3 4 5 6 7 8 9 10 | ------------ -[ (Host) ]- ------------ # yum install -y ntp # systemctl start ntpd && systemctl enable ntpd # Verify you can reach the NTP servers: # ntpq -p |
1 2 3 4 5 6 | ------------ -[ (Host) ]- ------------ # yum localinstall -y https://anorien.csc.warwick.ac.uk/mirrors/epel/7/x86_64/e/epel-release-7-5.noarch.rpm # yum localinstall -y http://resources.ovirt.org/pub/yum-repo/ovirt-release35.rpm # yum install -y ovirt-hosted-engine-setup bind-utils screen |
1 2 3 4 5 6 | ----------- -[ Host ] - ----------- # mkdir /home/tmpengineiso && cd /home/tmpengineiso # curl -O http://mirror.ukhost4u.com/centos/7.0.1406/isos/x86_64/CentOS-7.0-1406-x86_64-Minimal.iso # chown -R 36:36 /home/tmpengineiso |
1 2 3 4 5 6 7 8 9 10 11 12 13 14 15 16 17 18 19 20 21 22 23 24 25 26 27 28 29 | ----------- -[ Host ] - ----------- # host engine.xrsa.net; host ovirt01.xrsa.net # screen # hosted-engine --deploy ... --== CONFIGURATION PREVIEW ==-- Bridge interface : eth0 Engine FQDN : engine.xrsa.net Bridge name : ovirtmgmt SSH daemon port : 22 Firewall manager : iptables Gateway address : 192.168.122.1 Host name for web application : ovirt01.xrsa.net Host ID : 1 Image alias : hosted_engine Image size GB : 25 Storage connection : nfs01.xrsa.net:/home/engineha Console type : vnc Memory size MB : 4096 MAC address : 00:16:3e:71:de:6d Boot type : cdrom Number of CPUs : 2 ISO image (for cdrom boot) : /home/tmpengineiso/CentOS-7.0-1406-x86_64-Minimal.iso CPU Type : model_Westmere Please confirm installation settings (Yes, No)[Yes]: |
1 | $ vncviewer -quality 2 ovirt01.xrsa.net:5900 |
1 2 3 4 5 6 7 8 9 10 11 12 13 14 15 16 17 18 19 20 21 22 23 24 25 26 27 28 29 30 31 32 33 34 35 36 37 | -------------- -[ (Engine) ]- -------------- # yum -y update # yum localinstall -y https://anorien.csc.warwick.ac.uk/mirrors/epel/7/x86_64/e/epel-release-7-5.noarch.rpm # yum localinstall -y http://resources.ovirt.org/pub/yum-repo/ovirt-release35.rpm # yum install -y ovirt-engine bind-utils screen ntp # host engine.xrsa.net; host ovirt01.xrsa.net # systemctl start ntpd && systemctl enable ntpd # ntpq -p # screen # engine-setup ... --== CONFIGURATION PREVIEW ==-- Application mode : both Firewall manager : firewalld Update Firewall : True Host FQDN : engine.xrsa.net Engine database name : engine Engine database secured connection : False Engine database host : localhost Engine database user name : engine Engine database host name validation : False Engine database port : 5432 Engine installation : True NFS setup : True PKI organization : xrsa.net NFS mount point : /var/lib/exports/iso NFS export ACL : 192.168.122.0/24(rw) Configure local Engine database : True Set application as default page : True Configure Apache SSL : True Configure WebSocket Proxy : True Engine Host FQDN : engine.xrsa.net Please confirm installation settings (OK, Cancel) [OK]: |
1 2 3 4 5 6 7 8 9 10 11 12 13 14 15 16 17 18 19 20 21 22 23 24 25 26 27 28 29 30 31 32 33 34 35 36 37 38 39 | ----------- -[ Host ] - ----------- # hosted-engine --vm-status --== Host 1 status ==-- Status up-to-date : True Hostname : ovirt01.xrsa.net Host ID : 1 Engine status : {"reason": "bad vm status", "health": "bad", "vm": "up", "detail": "powering up"} Score : 2400 Local maintenance : False ... host-id=1 score=2400 maintenance=False state=EngineStarting # Please wait for around five / ten minutes for the hosted engine virtual machine to come back up properly. # hosted-engine --vm-status --== Host 1 status ==-- Status up-to-date : True Hostname : ovirt01.xrsa.net Host ID : 1 Engine status : {"health": "good", "vm": "up", "detail": "up"} Score : 2400 Local maintenance : False ... host-id=1 score=2400 maintenance=False state=EngineUp # |


1 2 3 4 5 6 7 8 9 10 11 12 13 14 | -------------- -[ (Engine) ]- -------------- # cat /etc/exports.d/ovirt-engine-iso-domain.exports /var/lib/exports/iso engine.xrsa.net(rw) # This is incorrect as the hosts are mounting this NFS share not the engine. You can fix this by changing to the subnet the hosts are using. # sed -i "s#engine.xrsa.net#192.168.122.0/24#" /etc/exports.d/ovirt-engine-iso-domain.exports # cat /etc/exports.d/ovirt-engine-iso-domain.exports /var/lib/exports/iso 192.168.122.0/24(rw) # systemctl restart nfs-server |

1 2 3 4 5 6 | -------------- -[ (Engine) ]- -------------- # curl -O http://mirror.ukhost4u.com/centos/7.0.1406/isos/x86_64/CentOS-7.0-1406-x86_64-Minimal.iso # ovirt-iso-uploader upload -i ISO_DOMAIN CentOS-7.0-1406-x86_64-Minimal.iso # rm CentOS-7.0-1406-x86_64-Minimal.iso |


|
Lo-Fi Version | Time is now: 19th April 2024 - 01:35 PM |
| Skin and Graphics by Dan Ellis and Anubis. Hosting by Forums & More © 2005-2011. |

 14 Apr 2020 - 1:04
